Embrace a Longer Harvest Season with Frost Protection for Your Vegetable Garden!

By Candace Marra
Most vegetables will need frost protection at some point if you’re growing into the fall and winter. Some plants are frost-hardy, which means they can tolerate frost and lower temperatures, but even these plants will need protection during hard freezes. Some of these crops can grow through the winter. Warm season crops planted in spring and summer will always need frost protection.
Which Vegetables Need a Cozy Blanket of Frost Protection?
Most vegetables will need frost protection at some point if you’re growing into the fall and winter. Some plants are frost-hardy, which means they can tolerate frost and lower temperatures, but even these plants will need protection during hard freezes. Some of these crops can grow through the winter. Warm season crops planted in spring and summer will always need frost protection.
What To Know About Growing Warm Season Crops as the Weather Cools in Tennessee
Warm-season crops will suffer significant damage if they are exposed to frost, usually to the point of plant death. This applies to the follow warm-season plants:
Tomatoes
Peppers
Most eggplant
Potatoes
Cucumbers
Squash
Melons
Most beans
Okra
Sweet potatoes
Most warm-season plants should be mature enough by August that you’re already harvesting from them. You can plant some early-maturing zucchinis and summer squashes in late July or early August, but it’s too late to plant most warm-season crops.
Frost-Hardy Plants
Cool-season plants thrive when nighttime lows are in the 40s and daytime temperatures are in the 60s. They can tolerate some frost, but some are hardier than others. Plant hardiness is a measure of how low a temperature the plant can tolerate before it suffers damage or dies.
The following cool-season plants can tolerate frost and will survive cooler temperatures that would be fatal for warm-season crops.

Although they can survive freezing temperatures, this doesn’t mean cool-season vegetables thrive in freezing temperatures. They can suffer damage from prolonged freezes. Cauliflower is sensitive to extreme hot or cold temperatures, and it won’t produce a good head if it experiences too many freezing nights. However, frost improves the flavor of some cool-season crops, including kale, carrots, and arugula.
At a minimum, cover cool-season vegetables whenever you expect temperatures lower than the uncovered hardiness levels for your plants. However, I recommend covering them anytime you’re expecting temperatures below 28, which is considered a deep freeze, especially if the conditions are expected to last more than a day or two.
There is no need to cover your plants when you’re expecting snow, unless it’s a significant snow event. Snow provides insulation and water for plants, both of which can keep them warmer.
When Should I Expect Frost?
You never know what the weather is going to do in Northeast Tennessee. Although the average first frost date throughout the Tri-Cities is around mid-October, a surprise September frost is always possible. The table below shows the average first frost dates in throughout the Tri-Cities:
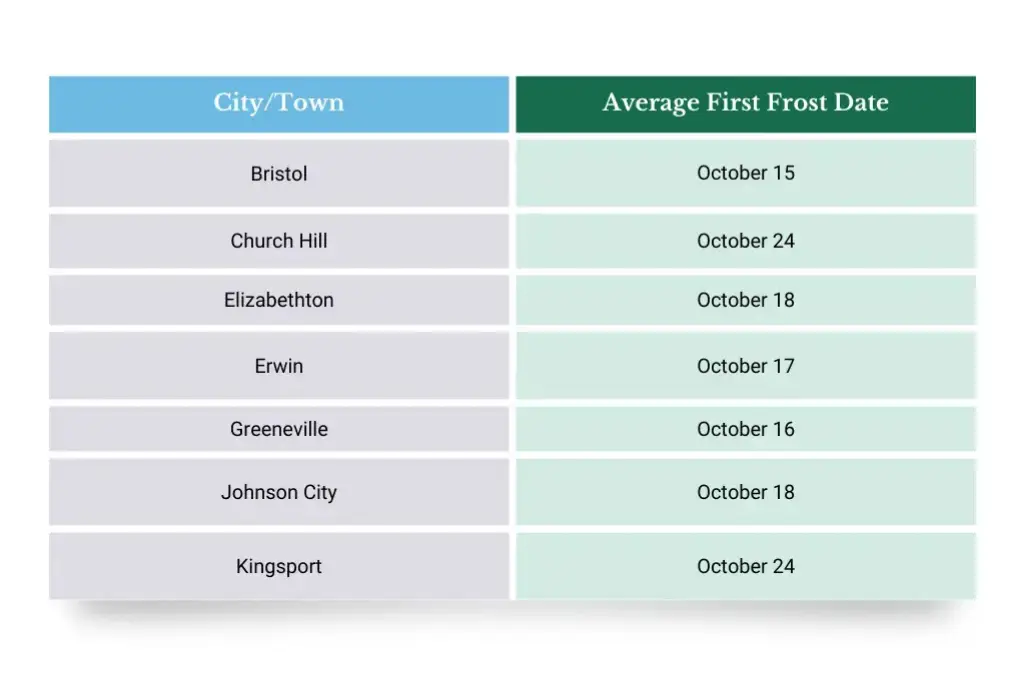
Information provided by the Old Farmer’s Almanac https://www.almanac.com/gardening/frostdates/tn
Remember, these are just averages. They’re based on historical data, which allows for a 30 percent chance of frost before these dates.
Before I started gardening, I believed frost could only happen if the temperature was 32°. However, gardening causes you to pay more attention to frost and temperature, and I’ve seen frost with air temperatures as high as 36°.
I’m also in a cold pocket, so I know my yard is going to get a degree or two lower than the forecast says. To be safe, I cover my tender plants when the overnight temperature is forecast to be below 40°.
If you want to grow your summer plants until late fall, start gathering your supplies and setting up your frost protection system now so you won’t be caught off guard.
Gather Your Frost-Busting Supplies
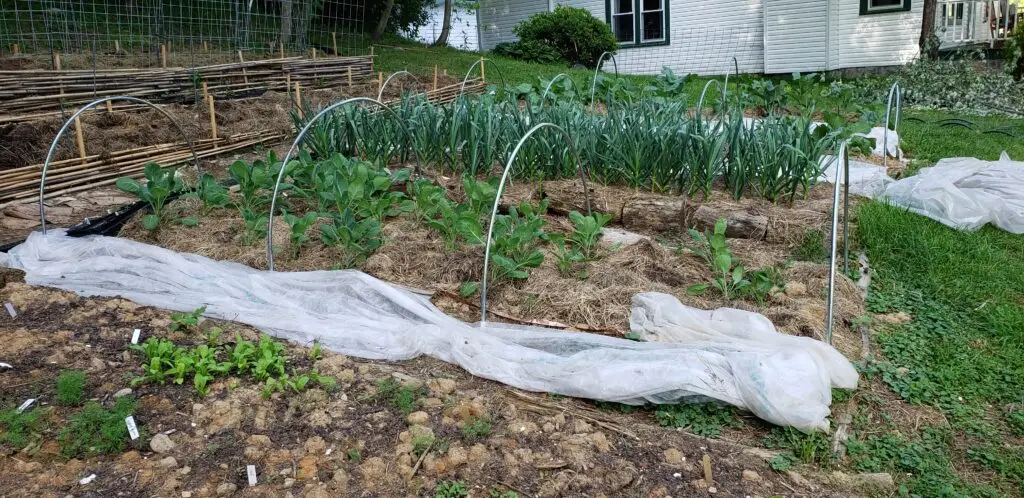
You’ll need some type of material to drape over your plants during nights when frigid temperatures are expected. You can use floating row covers to create a low tunnel or a cold frame if you have access to one. I prefer low tunnels. You’ll need the following supplies:
- Some type of cloth to cover your plants
- Hoops to support the cloth
- Clips to attach the cloth to the hoops
- Earth staples to secure the cloth to the ground between hoops
Cover Cloth for Frost Protection
You can use a variety of materials to cover your plants, including materials you already have. You can use bed sheets, thin blankets, burlap, and sheer curtains. Some people use wedding veil material. If your budget is tight or you don’t have what you need when frost hits, any of these materials will do the job.
I like to use material manufactured for this purpose. It will usually be labelled as frost cloth, row cover, or floating row covers. It is rated as first protection down to 28°, and it allows light and rain to get through it.
You ‘ll want the cloth to be wide enough to cover your hoops with a little to spare so you can easily attach it to the ground in or around your raised beds.
To calculate the correct width, use a string to measure the hoop:
- Place one end of the string or twine at the end of the hoop where it meets the ground
- Place the string against the hoop, all the way to the other end of the hoop.
- Cut the string at the other end of the hoop.
- Lay the cut string flat
- Measure the string.
- Your material will need to be at least one foot wider than this measurement.
You’ll also want it long enough to cover the length of your beds and touch the ground on both sides, with a little extra to spare.
Most frost cloth is sold in widths of six or ten feet. I recommend the ten-foot width. The length can vary from 20 feet to 100 feet. Amazon sells frost cloth. You can buy it here.
If you’d rather buy it locally, you can get it at Evergreen of Johnson City or Kingsport. Mize Wholesale in Johnson City also carries it. They don’t have a storefront, so you’ll have to call (800) 321-8161 ahead of time to order it.
Can You Use Plastic To Cover Plants for Frost Protection?
Yes, you can use greenhouse plastic to cover your plants, but there is an important disadvantage: You risk cooking your plants if you leave it attached and the daytime temperature gets higher than 50°. It only takes once to kill your plants.
The main advantage of using greenhouse plastic is that it has better insulating effects than cover cloth. You can even combine it with cover cloth for a little added protection.
Greenhouse plastic is especially helpful during a multi-day cold snap or in the winter when daytime temperatures rarely get high enough to cook plants. You’re essentially creating a mini greenhouse that gathers heat during the day, which can keep your plants warm a little longer at night.
Garden Hoops To Support Your Row Covers
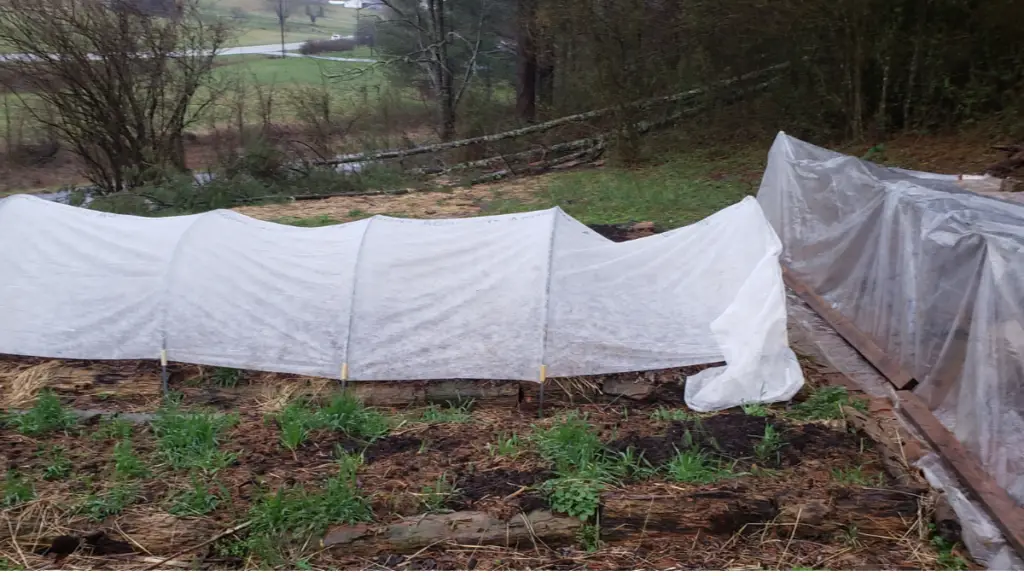
Although it’s okay to drape frost cloth directly on top of the plants, you must keep plastic coverings off of them. Plastic conducts cold, and any part of the plant it touches during a cold night could end up covered in frost or ice. Having said that, even if you’re just using cloth, your plants are safer if it doesn’t touch them. Your best bet is always to raise the covering material above the plants. The easiest way to accomplish this is to use hoops.
You can purchase garden hoops inexpensively on Amazon. I haven’t tried any of the hoops offered online, and I don’t trust them to hold up to severe weather.
I haven’t seen too many snowstorms in Northeast Tennessee in the fall, but they do happen. Wind and snow can wreak havoc on a weak low tunnel. Here in Butler, 40 mph and higher winds are common during the fall and winter months. If your low tunnels are side-by-side, the wind can blow between them and create a strong wind tunnel. It can pull them up or rip the cloth off. The weight of heavy snowfall can also cause your covers to sag, and the weight could bend your hoops.
Even if we don’t get severe weather in the fall, you’ll want to keep your row covers in place during the winter. You’ll only have to set up your hoops once, and you’ll be set all winter through next spring.
My Recommendation for Strong Hoops
I’ve had the same garden hoops for over ten years. Only one has bent, and a tree fell on that one.
My hoops are made of electrical metal conduit, a pipe-like material used to house electrical wiring in building construction. It’s a rigid material, but it can be shaped into hoops.
I haven’t been able to find the same hoops on the market now, so we decided to make them available in our store. Contact us online or send an email to ca*****@******************ns.com for a quote. We’ll need the dimensions of your garden beds and a list of the plants you want to cover in each. This enables us to determine what height you need.
Evergreen of Johnson City sells kits with cover cloth and hoops. This may be the perfect solution if you have a fairly small garden. If you have a lot to cover, you might be better off buying in bulk.
Hardware You’ll Need To Secure Your Cover Cloth
You’ll need hardware to secure your hoops to your beds and your cloth to your hoops.
Garden Clips
You’ll need garden clips to attach your frost protection material to the hoops. If you buy your hoops on Amazon, they may come with the clips you need. I’ve used plastic clips for years, but they degrade over time. This year, I’m using these. I like them because they’re stainless steel, and they look like they’ll be easy to attach and remove. The plastic clips were hard to put on and take off.
Even when you clip your cloth to the hoops, it will tend to rise up from wind, even small breezes. This deprives tender warm-season plants of the insulation they need to survive the night.
Hardware To Prevent Openings in the Cloth
Your covering should be wide enough that some overflows onto the ground or extends down all four sides of your raised bed. If it’s on the ground and you have a good-sized quantity of heavy items like bricks, stones, or logs, you can simply place them on top of the frost barrier to hold it down.
If you’re using raised beds, you could use bungee cords to hold the cloth up against the outside of the bed. You may also be able to tuck it between the soil on the inside of the bed and the interior wall. Some of my raised beds have one-inch top trim pieces that create a ledge. If you have this, you can use the garden clips to attach the cloth to the trim on either the inside or outside of the bed.
If you don’t have anything heavy to use to weigh your row cover down, you can use earth staples to attach them to the ground. I like to insert one per foot. Earth staples will put holes in your fabric, but they keep it secure, and you can use it in the same places next year. They’re inexpensive, and you can reuse them.
Securing Your Hoops
You have many options for attaching your garden hoops to your raised beds. Your options will vary based on what types of hoops you use and the height of your raised beds.
Attaching Your Hoops to the Ground
If your raised beds are a foot or less, you can insert the hoops into the ground outside the bed. Since most of our soil in the Tri-Cities is clay, getting the hoops to go into the ground can be challenging.
You’ll want your hoop to be at least six inches into the ground, and a foot is even better. The deeper it goes, the more stable it will be. I use a three-foot piece of rebar and a T-post driver to create a hole on each side of the bed for the hoops. This is how you can do it:
- Use one hand to hold the rebar where you want to place the hole.
- Use the other hand to lift up the T-post driver.
- Carefully place the T-post driver over the top of the rebar.
- Remove your other hand from the rebar before the rebar hits it.
- Pound the rebar into the ground until the T-post driver is even with the ground.
- Place one end of the hoop into the hole.
- Go to the other side and use the hoop to determine the position of the next hole.
- Repeat steps one through five.
- You may need to lift the hoop out of the ground to get both sides in the holes evenly.
You can get the rebar at Lowes. I found it in the lumber section.
Attaching Your Hoops to Your Raised Beds
The easiest way to attach your hoops to your raised beds is by using pipe straps. Pipe straps are metal U-shaped fasteners that attach with screws. They are often used with electrical conduit pipes.
You’ll need the following materials:
- Galvanized or zinc-plated pipe straps— two per hoop
- Exterior screws — two per pipe strap, and in a size that fits the fastener holes in your pipe straps
The pipe straps will need to be slightly larger than the diameter of your hoops. For example, if you have half-inch conduit, your pipe straps should be three-quarters of an inch wide. You can get pipe straps at Lowes, Ace Hardware, or if you prefer to order online, on Amazon. Lowes, Home Depot, and Ace Hardware sell exterior screws.
Attach the pipe straps to the inside or outside of the bed on each long side of your raised bed, being careful to measure so that they are in the same location on each side. Attach each with two screws. Then slide your hoop into the pipe straps.
If your bed has top trim like mine, you’ll need to perform one extra step. You’ll need a drill and a spade bit slightly larger than your hoops and two rubber grommets per hoop. The grommets will need to be the same size as the hole. You can buy assorted size rubber grommets here.
Determine whether you want your hoops on the inside or outside wall of the raised bed and the position. Use the spade bit to drill a hole in the top trim. Place one grommet in the top of each hole. This will prevent water from getting in and rotting your wood. The hole provides a pathway for your hoops to get to the area where you’ll attach them to the bed.
How Far Apart Should the Hoops Be?
Place your garden hoops two to three feet apart for the best stability. If you go further apart, your cloth will tend to sag. If your garden bed is six feet long, you can get away with using three hoops: Follow the guidelines below for other raised bed lengths:

What Is a Cold Frame?
Cold frames are wooden boxes with tops made of glass or plastic. Some are made to sit on top of raised beds. They’re often made to sit at an angle to maximize sunlight exposure during the day.
You must open the cold frame or remove it during the day if the temperature exceeds 50°, or you risk cooking your plants. You have to be very attentive and consistent about this. It only takes one missed day to permanently kill your plants. Some cold frames are built to automatically open when the interior temperature reaches a certain level.
Cold frames are great, but they’re more expensive than row covers. They’re also better suited for winter use with cool-season plants, when daytime temperatures stay below 50°. Most people build their own cold frames, but you can buy them online.
Six Tips for Using Row Covers To Shield Your Plants from Frost’s Chill
The following tips will help you maximize the frost-protective benefit of your row covers so your plants survive those early fall cold nights:
- Attach your hoops well before you’re expecting the first frost. If the first frost is forecasted on a busy day, all you’ll have to do is drape the cloth onto the hoops. It only takes a few minutes.
- Make sure the cloth is tucked in or attached tightly on all sides.
- If you don’t have hoops or if you need to cover plants on tall trellises, you can drape cloth row covers over the plants. Just don’t use plastic in this instance.
- Water your plants in the evening before the frost or freeze is expected. Moist soil holds in heat longer than dry soil.
- Add mulch or compost to the soil around your plants to help hold in heat.
- If you have any unfinished compost, find an area in your bed where it isn’t too close to the plants. Add as much as you can. Unfinished compost generates heat.
How Long Can You Keep the Summer Harvest Going?
In the Tri-Cities, the weather is full of surprises. You might enjoy warm days lasting until November—or face a first frost in September. Flexibility is key and having your frost protection ready by the end of August ensures you can bounce back from those unexpected frosty nights.
If you just have a couple nights of frost surrounded by warm days, you may still get a few more harvests out of your zucchini, peppers, cucumbers, and tomatoes, particularly if you’re hoping they will continue to produce.
As the days get shorter in the fall and temperatures dip below 50° at night, most of your warm-season fruiting crops will slow down or halt production. Tomatoes and peppers will stop ripening, and squash will stop growing. If this happens in October or later, it’s time to harvest your remaining fruits, ripen them indoors, and replace your summer plants with cool-season ones.
Keep in mind that some warm-season plants are sensitive to cool temperatures as well as frost. These plants can die from cold exposure even with frost protection. They may suffer some damage between 28 and 32 degrees, but once temperatures drop below 28, they may not survive.
Caring for Your Cover Cloth
Sometimes I think the hardest part of using cover cloth is preparing it for storage. The last thing I want to do is add waste to the landfills from my organic vegetable garden! The good news is your cover cloth is reusable as long as you take care of it. I’m the first to admit that I’ve set mine on the ground after uncovering vegetables and left it there. I had the best of intentions, but by the time I got to it, it was a muddy mess.
The best way to take care of your cover cloth is to leave it in place until you’re ready to put it away. I recommend leaving it attached until late spring after the danger of frost has passed. If the bottom of the cloth is wet and dirty, you can try rinsing it out with the hose and laying it out flat to dry. You may have to dry one cloth at a time if your space is limited.
Always remove cover cloth on a dry day when you’re not expecting rain. You can fold it or roll it back up onto the roll if it came on one, but make sure you wait until it’s dry. Wet cover cloth can mold.
These same rules apply to plastic. If you’re using sheets or burlap, you can machine wash them, but you may want to rinse them out with a hose first.
Use Those Handy Hoops All Year Long
Even after you remove the cloth cover, I recommend leaving the hoops attached to your raised beds. Garden hoops can be indispensable throughout the year. Here are some other ways you can use them:
- Attach shade cloth to extend the growing season for cool-season crops beyond spring. Your lettuce, broccoli, and cilantro will thank you with an extended harvest window.
- Attach insect netting to keep pests away from your plants. This is my favorite defense against cabbage moths. Just be sure to put it on before they show up!
- Use your hoops as garden stakes to support peas, peppers, or other plants that just need a little support but not necessarily full-blown trellises.
Stay Ahead and Keep Your Garden Growing
Gardening in Tennessee can be full of surprises, but with the right frost protection tips and tools, you’ll be prepared for whatever the weather brings. Don’t miss out on essential advice to help you extend your harvest, protect your plants, and winterize your garden effectively. Subscribe to our newsletter today, and get expert tips and seasonal updates delivered straight to your inbox — so your garden stays healthy and productive all year long!
This post contains affiliate links. If you make a purchase through one of these links, I may receive a commission at no additional cost to you.
Thank you for supporting this blog.